Access
In the left menu, the Builder application is accessed by clicking on the icon:
Any place you see this icon you can click on it to go directly to the builder. If you hold the mouse over the icon it will show a reminder of what it does.
Video
Watch this video to talk you through the information on this page and more.
What is the Builder?
The builder is, as the name implies, where you will be building your very own family circles. When you input your genealogy or just families that you want to make trees for, the builder will render a 3D model based on your inputted data. It’s a way to generate a really nice visualization of family relationships.
How to use the Builder
The video has a more visual display of all this information, but it also creates a sample family tree. If you read the instructions and have a hard time visualizing how it all works together please check out the video. There’s also a table below showing the mouse buttons for different set ups and now here’s the text instructions.
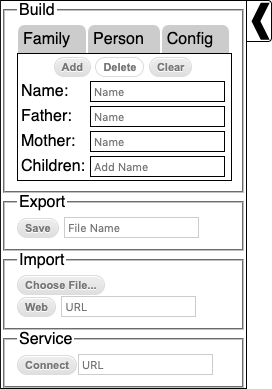
Build Panel:
The build panel can be collapsed or pulled out using the black arrow, and the build panel refers to all four boxes on the left. These boxes will be explained below.
Build Box:
There are 3 tabs to the builder box, 2 of them are used to build and edit the trees and the third one doesn’t have a function quite yet.
Inputting Names
- Adding new names:
- When you add a name that doesn’t exist in the system into the text box, if you press tab after typing it will turn into a grey box. When you add the family or name to the display, it gets turned into a green box since it’s now officially a part of the family circle.
- Linking existing names:
- If you’re trying to link an existing family member to a new family tree, a drop-down menu will appear when you go to type in their name. Hovering the mouse over the name will highlight where they are on the display to the right, and clicking on them will add them to the text box in a green box to indicate that this is a person that already exists in your family tree.
- Searching for existing names:
- If your family tree is too big to easily see everything, you can search for names in both the person and family tab.
- Family tab:
- If you start typing in the surname you want into the name textbox of the family tab, you will be able to hover your mouse over the name in the drop-down menu to see which families highlight on the right. Selecting one of these surnames will center the display on that family and pull up all the mother, father and children information on that family on the left as green boxes. It’s important to note that if you’re trying to make a new family with the same surname as another, you’re not going to want to select the name from the drop down menu since that’s just going to pull up build panel information for a different family.
- Person tab:
- If you start typing in the name of the person you want in the name section of the person tab, hovering over the name in the drop down menu will highlight them on the display. Selecting them will center the display on that person and also pull up all the information on them in the person tab.
- Editing existing names:
- Clicking anywhere on a grey or green box that is not the x will open up the ability to type on it again. If the box was green when you went to edit it, the box will turn yellow and you’ll have to click update on the top to change the display. If the box was grey when you went to edit it, it will still be grey since it hasn’t yet been input into the system in the first place.
- Using the x
-
- When the box is green:
- Pressing the x button on a green name is basically the same as clearing it. It’s not deleted from the system, it’s just been cleared from the textbox.
- When the box is grey:
- Since this person hasn’t been input into the system yet, pressing the x button is effectively removing them from the list of people to add on the right.
- When the box is yellow:
- This won’t remove the person from the system, but if you press update while the textbox that you’d edited is blank, then the person you were trying to edit will no longer be a part of the family they were in but will still have their unedited name (if you were doing an edit on a family tab) or they will no longer have a name but will still have a dot on the display (if you were editing them on the person tab).
Selecting Families/People
You can pull up the build panel for any existing family or person by left clicking on them while holding down the control key. This will show you all the information in the family tab or the person tab that is in the system for that family or person.
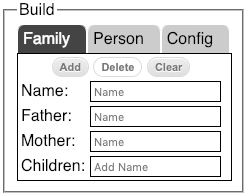
Family Tab
- 3 buttons
-
- Add/Update
- This will add the family to the display on the right, or update the family if you edited something.
- Delete
- This will delete the family connection. It does not delete the individual people in the family, it only deletes the family structure.
- Clear
- This will clear the text boxes. It does not delete an already existing family or saved changes to the family, it just clears the text boxes to allow for more typing.
- 4 textboxes
-
- Name
- The family name or surname goes here.
- Father
- The name of the father goes here, though to be clear, you do not have to use Family Circles to represent only male female relationships. Since this was made with genealogy in mind it’s going for biological connections, but you can use it for whatever family relations you wish.
- Mother
- The name of the mother goes here.
- Children
- The name(s) of the children go here. Use tab key to identify additional children.
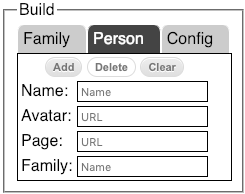
Person Tab
- 3 buttons
-
- Add/Update
- This will add the person to the display on the right, or update the person if you edited something.
- Delete
- This will delete the person from the system. They will no longer exist at all.
- Clear
- This clears the text boxes. It does not delete an already existing person or saved changes.
- 4 textboxes
-
- Name
- This is the first name of the person.
- Avatar
- If you put in a link to an image address here, the image will show up under the person’s name on the display to the right. Unlike names, this will not turn into a grey box when input.
- Page
- If you put in a URL or web address to a page that has more information about that person, the name on the right will be displayed as blue and you’ll be able to left click on the name there to open this page. Unlike names, this will not turn into a grey box when input.
- Family
- The family name or surname automatically gets put in for the children of a family, but for parents that aren’t a child of some other corresponding family the last name needs to be put in manually.
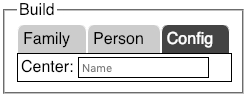
Config Tab
This is the tab that doesn’t really have a function at this time. Ideally what it will be able to do is allow you to change where the model will center initially, change the fonts, change the colors, etc. It’ll basically be a bunch of customization that isn’t a high priority at the moment.
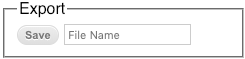
Export Box:
This is just how you save a file. Type in a name for your file in the text box that says “File Name” and once you’re satisfied with it then click the save button. The file will get automatically sent to your downloads folder and it will be a .json file with whatever name you chose for it before the period. There is no autosave feature for the builder so be sure to save often.
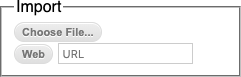
Import Box:
This is how you load up an already existing Family Circles file that you want to edit some more. Loading can be done in two ways, choosing a file or inputting a url.
- Choose File:
- Click the choose file button and it will bring up a window for you to search your computer. Find the file you’re looking for (it will be a .json file), and open it up. This will load the file onto the display on the right.
- Input a URL/Web address:
- All you have to do here is copy the URL of wherever you have the .json file. Once you click the web button, it will load up the display on the right.
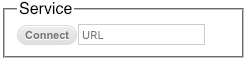
Service Box:
This allows you to add the functionality of the explorer to the builder, but it requires an extra step.
Instead of loading a saved file up into the builder directly, you will upload that file into the service (the symbol by the admin tab on the main menu) instead using the admin interface.
The URL you input into the builder service box will be the one which actually links to the file you just uploaded in the service (more information on this can be found on the admin and service tabs of the main menu). Once you’ve done this correctly, the search bar for the explorer will show up in the upper right corner of the screen.
Please note that if you want to save changes when you’re connected to a service, you will want to export the file from the service page, not the builder. Exporting from the builder will only export a file of what you have displayed, while exporting a file from the service will give you a copy of the whole thing.

Tools Panel:
- The black arrow:
- The tool panel can be minimized or pulled out by clicking the arrow.
- Click/Tap action:
- The symbol to the right of the arrow represents different modes for the click (or the tap on a touch device).
- Viewer mode:
- action opens up page/link for people with blue names.
- Builder mode:
- action loads the build panel with the selected person or family.
- Explorer mode:
- this is only available if a service is connected, if it is then the action expands relationships for people that have blue dots.
- ? About/Help icon:
- The question mark button will pull up a little screen with a link to the Family Circles home page and also this builder instructional page.
Actions
The following table shows all the default supported functions and actions to perform them. If the Tools Panel is used to adjust the default click/tap then the function that is swapped can be done using the action that was swapped.
| Function | Action | ||
|---|---|---|---|
| 1 Button Mouse | 3 Button Mouse | Touch | |
|
Open Related Page Titles are different color (Blue) if available |
Mouse Click | Left Mouse Click | Single Finger Tap |
| Look at/Center on Item | Double Mouse Click | Double Left Mouse Click | Double Single Finger Tap |
| Rotate Model | Mouse Drag | Left Mouse Drag | Single Finger Drag |
| Zoom In/Out Model | CTRL Mouse Drag | Middle Mouse Drag/Scroll Wheel | 2 Finger Spread/Pinch |
| Pan Model | Shift Mouse Drag Meta/Command Mouse Drag Arrow Keys |
Right Mouse Drag | Double Finger Drag |
|
Expand Relations Dots are different color (Blue) if available |
Shift Mouse Click Meta/Command Mouse Click |
Right Mouse Click | Shift Single Finger Tap Double Finger Tap |
| Load Build Panel | CTRL Mouse Click | Middle Mouse Click | CTRL Single Finger Tap Three Finger Tap |